The first thing you probably want to do once you've downloaded your shiny new Content Sparks course materials is get your teeth in and start making the content your own.
But where to begin?
If you intend to buy lots of products from us, (as of course we hope you do!) you'll find the easiest and fastest way to get everything done is to put together a process that you can implement each and every time you start working with a new package. You'll become so familiar with what you're doing it'll soon take you no time at all to get your content completely branded.
One of the elements that we get the most questions about are the PowerPoint Slideshows included in all Beacon and Blaze packages. It can take a little while to get used to branding them as your own; but once you've mastered the steps, you can use the exact same process time and time again.
We've created the perfect powerpoint process to share with you here! (You can thank us later…)
First…. Gather Your Branding
You can't get much branding done if you don't have your branding elements available.
It's a good idea to create a folder that includes everything you'll need to brand all of your Content Sparks documents. You'll only need to do this once as you'll use those same elements in everything you do.
Gather things like:
-
- Fonts – Make sure they're installed on your computer and keep the font files if you ever need to outsource
- Brand Colours – you’ll need the 6-digit hex color codes of any colors you want to use, or samples on your document that you can pick from
- Your Logo – you’re going to put this on everything so make sure it’s high quality and a .png version that has a transparent background
- Your Headshot – again, make sure it's a good one and reflects your branding (e.g, professional or casual)
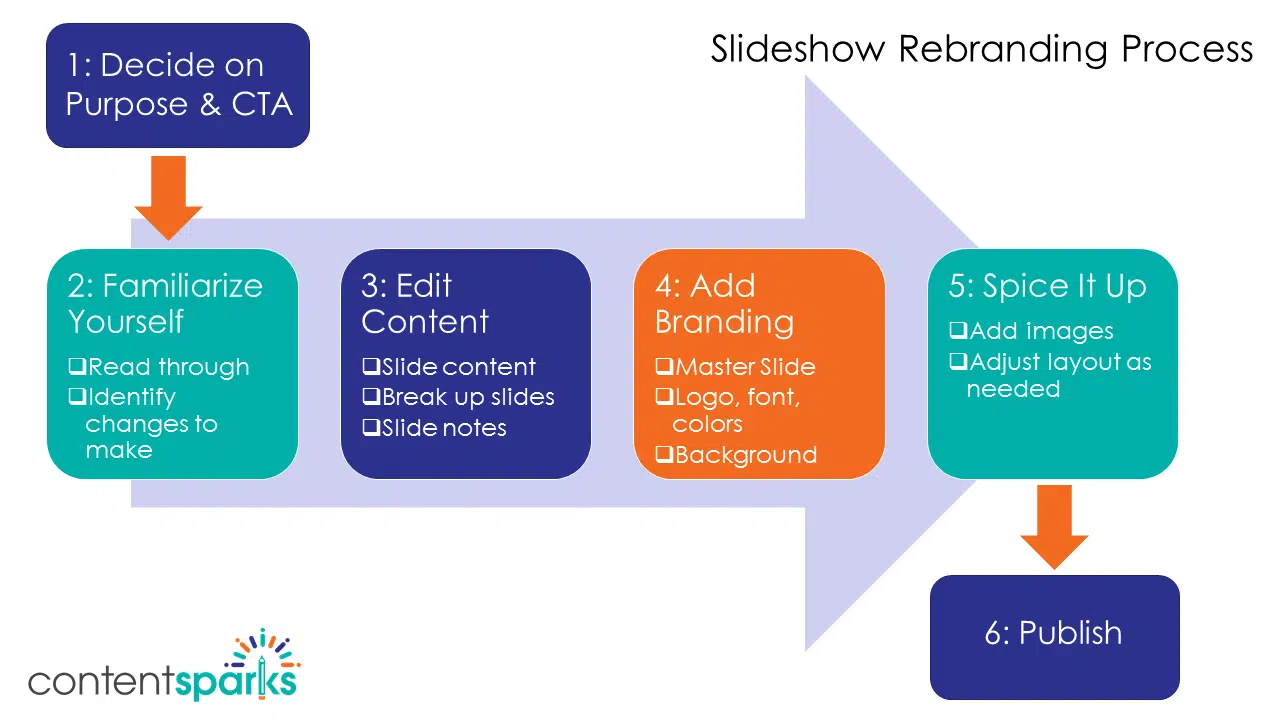
Once you have everything you'll need at your disposal you can get started. This is a simple 6-step process, and we've created some videos to better explain some parts.
Step 1. Decide on Purpose and CTA
Begin by knowing where you want to end up. What are you going to do with your slideshow? Where are you going to publish it? Who is going to see it and what do you want them to do afterwards?
For example, if you're going to use it for visibility, plan to upload it to a platform like SlideShare where you know people will find it using the tags you assign to it. You could also add narration to it and create a video to upload to YouTube or Facebook, share on Twitter or LinkedIn, or add to your website. You could even do all of those things to get the most visibility!
Whatever the end goal, just make sure that your Call to Action (CTA) at the end of the slideshow reflects that. Get your redirect URL together if you want to send people to a sales or opt-in page, or figure out any other CTA you might have.
Step 2. Read Through & Identify Changes
You need to know what you’re teaching your clients, so make sure you read through the slideshow and notes before you make any edits to it. Watch the video below for more info.
- Familiarize yourself with everything before you make it your own
- Check both the slide content and the speaker notes, since you'll use those as a script
- Make a note of things you want to change and add
- Create comments as you go through and then go back later to make changes
Step 3. Edit Content
This next video looks at editing your content and how to break up slides.
- Run through and make the changes you left comments about
- Change your title, word use, add extra content, or break up slides
- Create duplicate slides to break things up by right clicking on the slide, then selecting ‘Duplicate Slide'. Don't forget to delete the content you don't want in each of the duplicated slides!
- Add your CTA at the end – including your URL
Having trouble editing your Smart Art graphics?
Here's a longer tutorial with lots of tips:
Step 4. Add Branding
Now we're going to start adding some branding. Watch how to do that in this video, using the Master Slide view in PowerPoint.
- Make most edits using the Master Slide to make changes to the entire document
- View ribbon > Slide Master
- Select the first slide in the navigation pane to remove the ‘Your Logo Here' placeholder
- Add your own logo, change fonts and colours, and format your background
Step 5. Spice it Up (Optional, but Valuable)
This video covers adding images to jazz up your slideshow and give it some visual impact.
- Simple text can get a bit boring so include images to keep your audience engaged
- Use the same process as you used to incorporate your logo – Insert > Pictures > Picture from File > select your image
- Make sure your image isn't covering your text
- Shift them alongside one another, expand to fill the whole slide, and alter the layer arrangement as needed
Here's an example of what you can do with some images in your slideshow, where we expanded images to cover the whole slide and then arranged the text on top in a solid color rectangle…
Step 6. Publish
Once you've edited your content, added your branding, made any other changes, and you're happy with the finished product…. it's time to publish.
Go back to the goal you outlined for your slideshow in the first step to figure out the best format for you.
Here are some examples:
- To upload a copy to SlideShare – save as a .pptx and upload directly
- To create a video – add some sound/narration and save as .MP4. For visibility videos, upload to YouTube, Facebook, Twitter, and LinkedIn. For course videos, add to a teaching platform like Teachable.
- To create a handout – either export handouts to Word, or save and print a .PDF
- To export slides as images – ‘Export' all slides or a particular slide to ‘Change File Type' to .JPG or .PNG
- To present to an audience – save as .pptx and open on any computer with an up-to-date version of PowerPoint
Conclusion
So there you have it – a completely rebranded slideshow ready to publish to your audience in six very simple steps. Of course you can spend a little more time on things to make it even more unique or on-brand, but you'll figure out the bits that need a little more attention as you go along.
It’s also a good idea to practice presenting your slideshow to an audience. Try reading from the speaker notes and time yourself to see how long it takes. If possible, get your friends, family, or colleagues involved too for some constructive criticism.
And remember, you want everything to fit together as seamlessly as possible, so if you’re editing the main slideshow of the Content Sparks package, make sure that any changes you’ve made to your course book are reflected there.
Want to ensure you covered all the steps? Here's an overview graphic to recap!
NOTE: The example we used in the videos is from our brandable course on Powered Up Processes. In fact, the slideshow rebranding steps are a prime example of a process 🙂
Want to learn more and teach others about creating Powered Up Processes?
Check out our brandable, done-for-you course on supercharging your business and simplifying your life by streamlining your business processes:
CLICK HERE for Powered Up Processes >>
When you purchase one of our brandable packages, you get a license to:
- Edit it any way you want
- Put your name and brand on it
- Share with prospects or sell for 100% profit
Check it out and let us know if you have any questions!
Tags
You may also like
Comments are closed.


Great post! I always recommend rebranding slides from PLR and adding your own touch. The first and last slides are VERY important, but all the slides should be refreshed. I don’t recommend putting your logo on every slide, because it distracts from the content, but make it BIG on the first and last slides. I have some technical points for copying colors from a website to a presentation at https://www.ellenfinkelstein.com/pptblog/8-steps-to-add-branding-to-your-presentations/.
Thanks, Ellen! Love your tips. I always learn something new from you 🙂