Are you a visual person? Do you have difficulty picking out the key points in a big block of text? If so, you can be sure that readers or viewers of your content feel the same way. So wouldn’t it be great if you could just grab the content and convert the text to a mind map?
If you have a large block of text; for example a lengthy blog post or article, it’s tough to imagine how that would look sprawled over a page as a mind map… but it can serve as a great tool for viewers to help them quickly grasp the concepts you’re trying to convey.
Mind Maps are a fantastic tool for showing information in a visual and more dynamic way. They play to the nature of how the brain itself works, helping people understand and remember key points of information more easily.
However, converting text to mind maps is not a simple copy/paste/send process. We’ve outlined the steps you need to follow below.

Step One – Breakdown
The most important part of this process is in the way you begin. Take your block of text and begin to pick the key points out of it, thinking about levels of importance as you go. You’ll need to put these points in a text document, (such as Word or Pages) and arrange them as indented according to importance.
For example, start with your title at the first level;
How to Convert Text to a MindMap
Next, add your first subtitle;
How to Convert Text to a MindMap
Step One – Breakdown
Then begin to add key parts from each paragraph or section of text at the next level of indentation;
How to Convert Text to a MindMap
Step One – Breakdown
The most important part of the process is in the beginning
Take your block of text and pick key points out of it
Think about levels of importance as you’re reading through
Arrange points as indented according to level of importance
Put points into a document using Word or Pages
Continue to do the same for all the text you want in the mind map. Remember that only the title should be on the first level of indentation, and keep all subtitles on the same second level.
Step Two – Refine
When you’re beginning to work with converting text into a visual mind map, it’s good to go over the information you’ve pulled out again to see where you can cut down or reorganize details. You’ll probably find that with practice you’ll skip this step altogether and begin to refine information as you pull it from the text.
The key here is to keep things to a minimum. You don’t have too much space and a cluttered mind map is a useless mind map.
Let’s take a look again at our points taken from the first step:
How to Convert Text to a MindMap
Step One – Breakdown
The most important part of the process is in the beginning
Take your block of text and pick key points out of it
Think about levels of importance as you’re reading through
Arrange points as indented according to level of importance
Put points into a document using Word or Pages
The title and subtitles can’t really be altered, but we could eliminate a lot of extraneous wordiness from the third level of points;
How to Convert Text to a MindMap
Step One – Breakdown
The most important part
Pick key points from text block
Think about levels of importance
Indent points according to importance
Put points into a document using Word or Pages
We’ve taken out a lot of irrelevant extra information now from each of those points and kept the bare minimum. But we can go a little further…
How to Convert Text to a MindMap
Step One – Breakdown
The most important part
Pick key points from text block
Indent points according to importance
Put points into a document using Word or Pages
‘Think about levels of importance’ isn’t a necessary point considering that the next point in the list, ‘Indent points according to importance’ covers that action, so we can take that one out altogether.
We can also break things down even further and create a fourth level:
How to Convert Text to a MindMap
Step One – Breakdown
The most important part
Pick key points from text block
Indent points according to importance
Put points into a document using Word or Pages
Word
Pages
The two-point list within the final point, ‘Put points into a document using Word or Pages’ works much better visually as a branch leading on to the two software names which can now be visually picked out and processed from the rest of the text.
Again, go through the rest of your information and see what you can improve upon. Be ruthless when it comes to getting rid of what you don't need, but maintain the overall topic in mind so that you don't cut any important information.
Step Three – Convert
Your information should now look something like this;
How to Convert Text to a MindMap
Step One – Breakdown
The most important part
Pick key points from text block
Indent points according to importance
Put points into a document using Word or Pages
Word
Pages
Step Two – Refine
Go over information again
Cut down
Reorganize
Practice this step
Keep things to a minimum
Be ruthless but keep topic in mind
You’re now ready to create your mind map, using one of a few different methods.
Using Pen and Paper
Take your level one title, (i.e. ‘How to Convert Text to a MindMap’) and place it in the center of your piece of paper. Put a circle or square around it.
Next, place your level two points, (i.e. ‘Step One – Breakdown’ and ‘Step Two – Refine’) evenly spaced, around your center title.
Then you can begin to fill in the level three and four points, around their respective subtitle. Try and keep things as evenly spaced as you can to avoid for confusion and add circles or squares around each point to break them apart from everything else.
Using Software
Using the same method as you would with pen and paper, use software such as Freemind to create your Mind Map. The benefit of using software is that you can easily move things around, and add to them at a later date.
Some other popular mind mapping software includes MindMeister (free for 3 + paid), XMind (free and paid), Bubbl.us (free & paid), and Coggle.it (free).
Automate
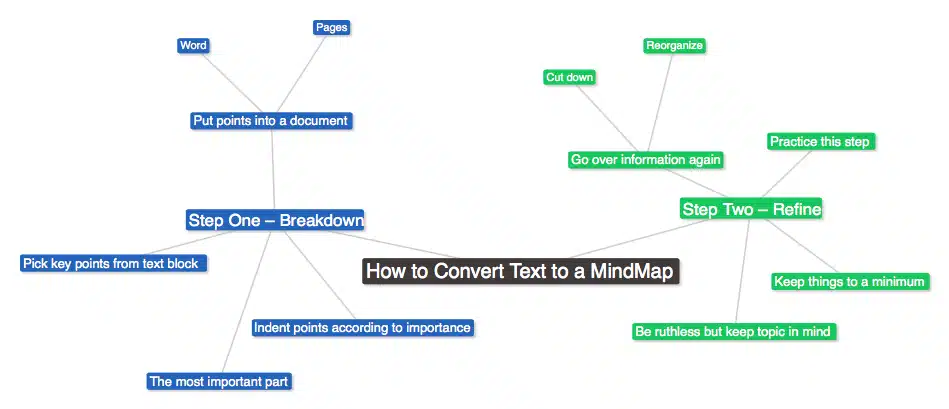
Some online apps will allow you to simply input information and hit a button before creating your mindmap for you. Text2Mindmap uses the same indentation level format to establish what goes where, so you can simply paste your points, (maintaining those levels) click ‘Draw Mind Map’, and you’ll end up with something that looks a little like this;

Just as with Freemind, you can drag things around, change colors, etc. It’s worth spending a little time playing with to get the aesthetics just right – after all, that’s why you converted it in the first place!
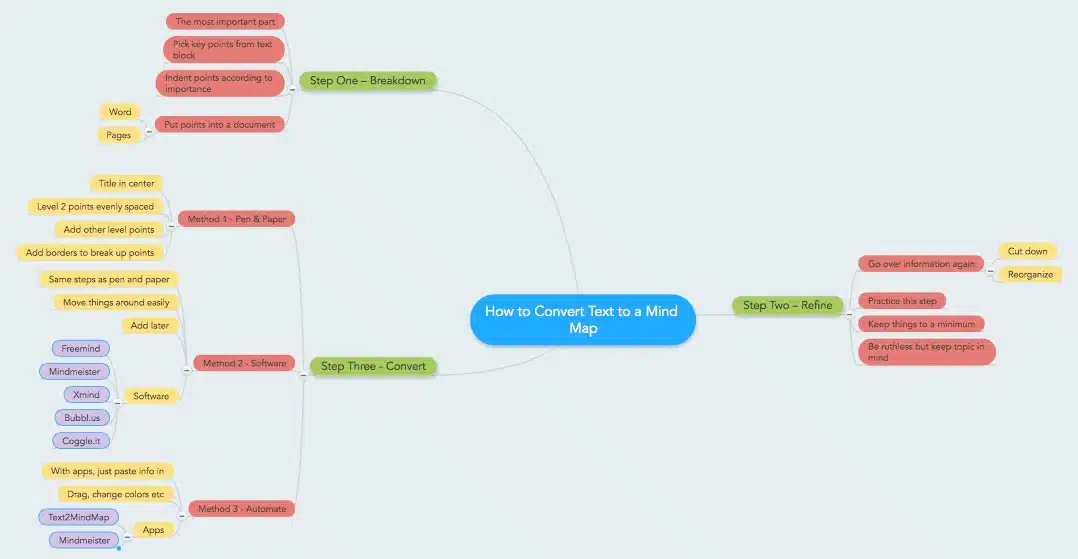
One last note is that very few mind maps apps have a feature for importing text to create a map. If you decide to get MindMeister, it’s possible to import something like the outline we did above or just copy/paste it into a text box. Use spaces instead of tabs if the indents aren’t working. It should then create a mindmap in their format, such as this one below. You can then apply any type of color and formatting you want:

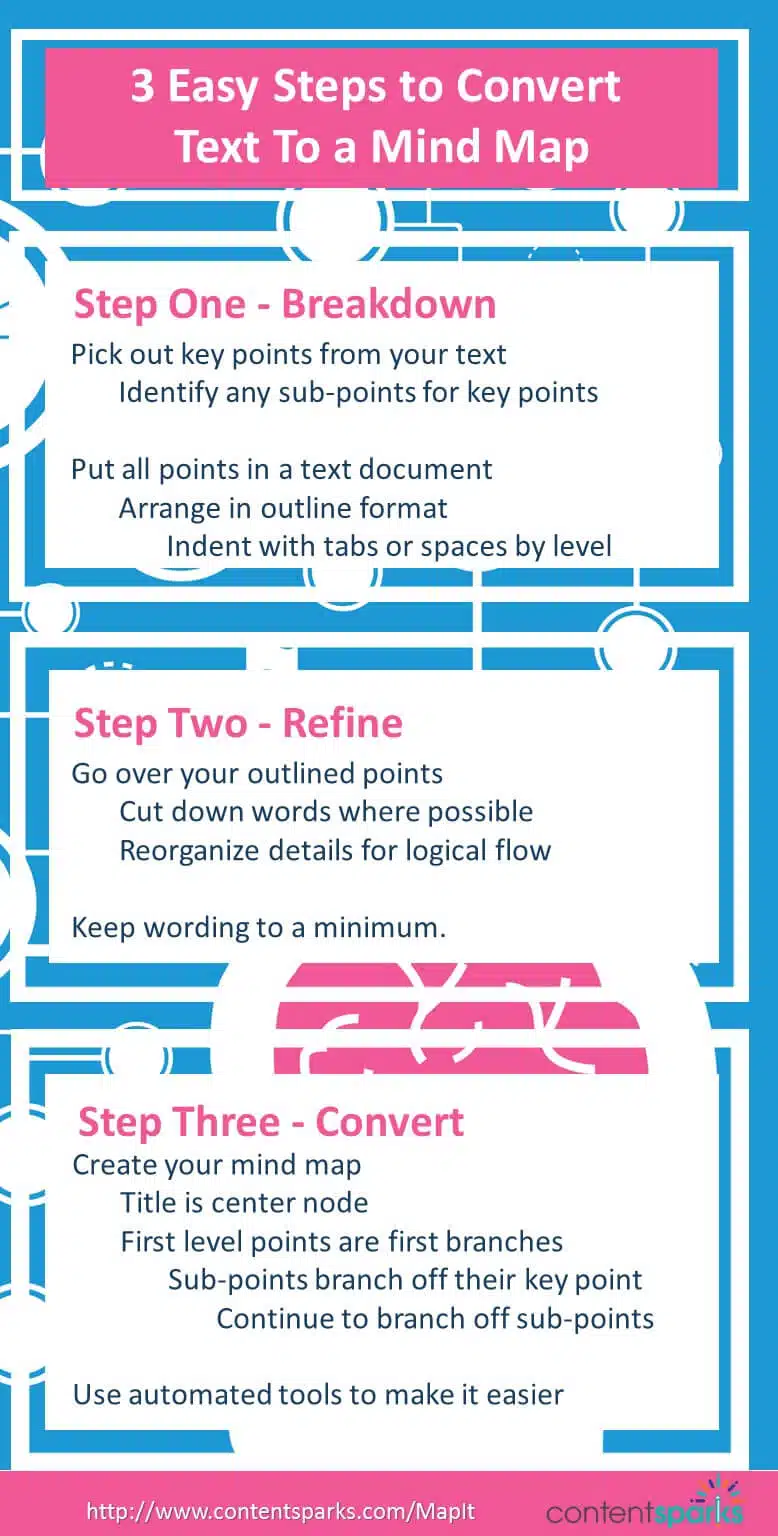
Here's what the key steps from this tutorial look like in a map of their own, using MindMeister and some formatting. Obviously, it's not as easy to read at this size in a blog post, so I would stick with the infographic above (at the beginning of the post) for an overview. Then I would use something like this mind map to explain step-by-step, opening each branch as I walked through it.

For a walk through of how you can use mind maps to give presentations and webinars, be sure to check out my video demo in the post on How to Use Mind Maps for Webinars, Presentations, and Video.
Now give it a try yourself.
You can copy/paste the outline text we used above to test out the Text2Mindmap app first to see if you like it. Or try signing up for the free account of MindMeister. Just be sure that the tabs (indents) or spaces (for MindMeister) are correct in your outline. Otherwise, you won’t get the correct size and placement of branches.
Then try creating your mind map in Freemind. You’ll have to do more of it manually, but you may like the layout a bit more since it shows up in a more linear order. And it’s completely free!
Which tool you use depends on which one you feel most comfortable with, both from ease of implementation and visual aesthetics.
Have you ever converted text to a mind map? Which tool do you like best?
Want a pdf version of this tutorial so that you can keep it handy?
Just click on the link below and we’ll send it to you:
Course Creators... do you need content for your online course but don’t have time to create it yourself?
Check Out Our Full Range of Courses in the Shop
Teach Yourself. Then teach your audience.

When you purchase a license to any of our ready-to-go course kits, you get the rights to edit it any way you want (or leave as-is) and add your own name and branding.
Then use your new course to:
- Attract new clients and customers (such as with a free training, webinar, or eCourse)
- Add a new stream of income (such as with a paid course or workshop)
- Keep your current customers successful and coming back for more (such as with bonus webinars, videos, and other learning resources).
Enjoy!

Tags