How to Create a Lead Magnet For Your Online Course: Tools And Tips

0  comments

Okay, be honest: how many blogs have you subscribed to in the past 90 days?

Or rather, how many people have subscribed to your blog in the past 90 days? While “subscribe to our blog” may have worked to build an email list in 2009, it’s not nearly as effective now. Our inboxes are all filled with brands clamoring for attention, and your potential customers are more wary than ever about who they let in. 

So what’s a coach or course-creator to do? Offer a problem/solution lead magnet instead. 

Lead magnets are highly effective list builders, but they can be tricky to set up and get right on your website. In this guide, I’ll show you the exact process I follow to create a lead magnet that attracts your potential customers and directs them into your email list and funnel. 

What is a Lead Magnet?

A lead magnet is a freebie that you give away to entice your ideal customers to subscribe to your list. It could be anything, but the key is to add value, address a specific problem with an easy solution, and catch the attention of potential subscribers. 

Common lead magnets are things like:

  • Workbooks
  • Webinars
  • Mini-courses
  • Checklists

Make sure your lead magnet solves a problem and that it is compelling enough to encourage sign-ups. Read on to see my favorite types of lead magnets you can create.

What Types of Lead Magnets Can You Create?

Lead magnets can come in a variety of forms (I use several throughout my website!) Here are the ones I find to be most effective:

  • Workbook: Create a workbook or ‘Action Guide’ on a topic closely related to your course. Make sure it gives some simple steps that address a common problem or question your target audience might have. Then include worksheets giving instructions for how to complete those steps and write down their notes or answers. This builds you up as an expert and gives a preview of what’s in store for prospective students.
  • Mini-course: Offer a free mini-course as an appetizer for what students can expect from your full course. This can be a series of short videos, a PDF guide, or an email course delivered over several days.
  • Free Challenges: Organize a challenge related to your course topic, such as a 5-day, 7-day, or even 30-day challenge, encouraging participants to achieve a specific goal while demonstrating the value of your full paid course or coaching program. 
  • Templates or checklists: Create templates, checklists, or toolkits that your audience can use to solve specific problems or streamline their processes. These resources should be directly applicable to their needs and easy to use, offering immediate value and a taste of what your full course covers.
  • Exclusive reports: Conduct original research or compile industry insights into an exclusive report. This type of lead magnet can attract professionals looking to stay ahead in their industry and build you up as a go-to resource.
What Types of Lead Magnets Can You Create

Pick a type of lead magnet and read on for tools to create it.

Best Tools to Create Lead Magnets

As you can see, lead magnets can be extremely diverse. Because of that, there are dozens of tools you could use to create one and place it on your website. 

To make things easier, I’ll break them down into tools for:

  • Workbooks and downloads
  • Videos and mini-courses
  • Interactive content
  • Email automation and nurturing (to deliver your lead magnet)

Tools to Create Workbooks And Downloads

Look no further than these tools to create a workbook or PDF lead magnet:

  • Google Docs or Google Slides: Sometimes the simplest tool is the best one. With Google Docs and Google Slides, you can create custom-designed PDFs or templates for your readers to download.
  • Canva: An intuitive design tool with templates for eBooks, reports, and guides, making it easy for non-designers to create visually appealing PDFs.
  • Designerr: A budget-friendly online tool for creating eBooks and reports quickly. Includes an AI writing assistant too, but be sure to edit any output to sound like you!

Tools to Create Videos and Mini-Courses

Looking to create a video or mini-course? Here are my favorite tools to get the job done:

  • InVideo: Includes templates and text-to-speech options so you can create videos quickly. 
  • Camtasia: A screen recording and video editing software, excellent for creating tutorial videos, product demos, or educational content.
  • Descript: The easiest tool for editing video and audio, but which also includes tools for recording. 
  • Loom: A straightforward way to create and share video messages or screen recordings, ideal for quick tutorials or personal introductions.

Tools to Create Interactive Content (Quizzes, Surveys, Tools)

Interactive quizzes and assessments are all the rage these days, here are some of my favorite tools to set them up:

  • Typeform: Known for its clean, interactive forms, Typeform is perfect for creating stunning quizzes, surveys, and other interactive content.
  • Thrive Quiz: A WordPress plugin that makes it easy to create quizzes that also segment your audience based on their answers. It’s also available as part of the complete Thrive Suite, which I use on my website.

Tools For Email Automation and Nurturing

While there are dozens of tools you can choose from for email automation and nurturing, these are my favorites:
  • Convertkit: Convertkit is a simple email list builder and automation tool for course sellers. It’s one of the cheapest and simplest tools on this list.
  • GetResponse: GetResponse is a long-time popular, full-featured platform that charges based on list size, which makes it very affordable as you scale your business. They even have a plan that includes webinars. Like most others listed here, it integrates into many other tools.
  • HubSpot: HubSpot is a popular email marketing and automation tool that packs a punch with other features. It’s the most expensive option on this list if you want automation features that are only available in their Pro tier.
  • MailerLite: MailerLite is also one of the more reasonably priced email marketing platforms with all the features you would need to nurture relationships.
  • ActiveCampaign: I use Active Campaign for my email marketing and it’s a fantastic option. You can build segmented lists, automate email sequences, and track your subscriber growth and sales over time.
The Ultimate Online Course Launch Checklist

The Email List Builder Checklist

Use this checklist to take action with your online course today! 

How to Set up a Lead Magnet For Your Online Course: The Exact Steps to Follow

You’ve got a lead magnet idea and the tools for the job. Now it’s time to follow these steps to create and launch your lead magnet on your website:
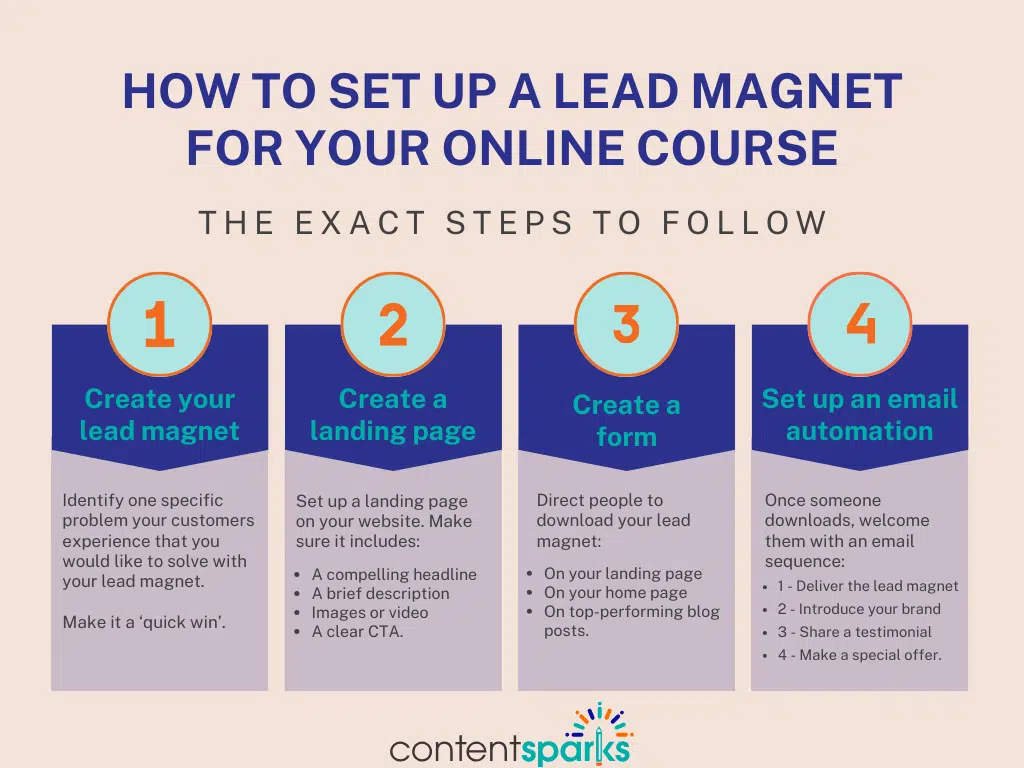
  • Create your lead magnet
  • Create a landing page
  • Create a form
  • Set up an email automation to send your lead magnet
How to Set up a Lead Magnet For Your Online Course

Create Your Lead Magnet

First, identify one specific problem your customers experience that you would like to solve with your lead magnet. It shouldn’t be a huge challenge, but rather something smaller that can be addressed quickly. Think ‘quick wins’ here.

Once you’ve settled on a problem, select a type of lead magnet from the list above and the tools you’ll use to create your lead magnet. And get to work. 

For example, in this post I include a downloadable ‘Email List Builder Checklist’ that also contains a list of lead magnet ideas to guide and inspire you for your own website. The problem I am solving is “I don’t know where to start or what type of lead magnet to create” and the solution I am providing is simple a simple checklist and examples to get you started. 

As another example, on other blog posts, I include checklists or templates to provide a practical application for the topic the post covers. 

You don’t need to be an expert designer to create a good-looking lead magnet either. Design tools like Canva make it a snap to package up a stunning lead magnet that stops potential subscribers in their tracks.

Create a Landing Page for Your Lead Magnet

Now that you have your lead magnet in hand, it’s time to promote it on your website. 

The simplest place to start is to set up a landing page on your website to promote your lead magnet. You can style the landing page however you like to match your branding, but be sure to include:

  • A compelling headline that captures a site browser’s attention
  • A brief description of what the lead magnet offers and how it addresses the visitor's needs.
  • High-quality images and/or a short video explaining the lead magnet further. 
  • A crystal-clear CTA (call to action). Use active phrases like “Download Now” or “Get Instant Access” or “Send Me the Report” to encourage visitors to take action.

Create a Form for Your Lead Magnet

You’ll obviously have a form on your landing page for your lead magnet but don’t neglect other places on your website.

At a minimum, you should direct people to download your lead magnet:

  • On your landing page
  • On your home page
  • On top-performing blog posts

I like to mix and match different types of forms. For example, you could have a form at the bottom of a blog post and a slide-in or pop-up form that appears when people scroll down the page. 

Keep your form simple to encourage conversions, but make sure to get important information like:

  • An email address
  • A first name (last name can be optional)

You can try asking for more information like a company name, website, and phone number but adding too many fields can lower your conversion rates so beware of making things too complex. 

Set up an Email Automation to Send Your Lead Magnet

Once someone downloads your lead magnet, it’s time to welcome them to your list. 

A simple welcome sequence delivers the lead magnet to your new subscribers and introduces your brand to them. If you don’t have a welcome sequence now, try writing the following emails and space them out a few days in between each send. But don’t space them out too much or people will forget who you are and what you sent:

  • Email 1 - Deliver the lead magnet: This should be a simple email. Thank your new subscribers, remind them what they signed up for and its benefits, and share a link where they can view the lead magnet.
  • Email 2 - Introduce your brand: In this email, say hello and introduce yourself. Tell your subscribers what problems you solve, and share an example of how you solve them.
  • Email 3 - Share a case study or testimonial: Your new subscribers may be a bit unsure, so show how you can help them by sharing a case study or testimonial. This builds you up as an expert and encourages new subscribers to eventually buy.
  • Email 4 - Make a special offer: Now that your subscribers know what you do and have seen proof that you can help them, offer something special. It could be a discount or an extra freebie with their first purchase to entice them to buy.

And voila! Your very own lead magnet funnel for your online course. 

Use this lead magnet to build your email list and you’ll have an engaged audience waiting for your next launch.

Just remember to keep sending value-packed, relevant email content to your subscribers. Many new leads may not be ready to buy from you right away. However, the more you help them with their challenges, the more likely they’ll be to buy something in the future!

Download My Email List Builder Checklist with The Best Lead Magnet Ideas to Build Your List Fast

Ready to grow an email list with high-converting lead magnets? Not sure where to start?

If you have a case of writer’s block or list-building overwhelm, don’t worry. I collected my top 10 lead magnet ideas you can use to build a thriving email list that will wait for your next course launch. 

It’s all part of our email list builder checklist that guides you as you nurture your list.

Download the checklist and lead magnet ideas to start growing your audience today!

Click here to subscribe

Enjoy!

sharyn sheldon signature 2020 1 1

Tags


You may also like

Is Selling PLR Products Worth It?

Is Selling PLR Products Worth It?
Leave a Reply

Your email address will not be published. Required fields are marked

{"email":"Email address invalid","url":"Website address invalid","required":"Required field missing"}