Here's a hard truth: Your target customers aren't going to buy anything from you if they don't know you can deliver results.
Unless you've already proven you can help them, you're always going to be fighting an uphill battle for sales.
Fortunately, there's an easy way to show your value and win loyal followers at the same time. Create a short, online course that gets those ideal customers onto your email list. If you deliver your course to subscribers over several emails, as an ‘eCourse', you can then build a relationship with them. They'll see the value you provide and will eventually want to buy from you.
Why would you want to use an eCourse rather than something like an eBook?
A few reasons:
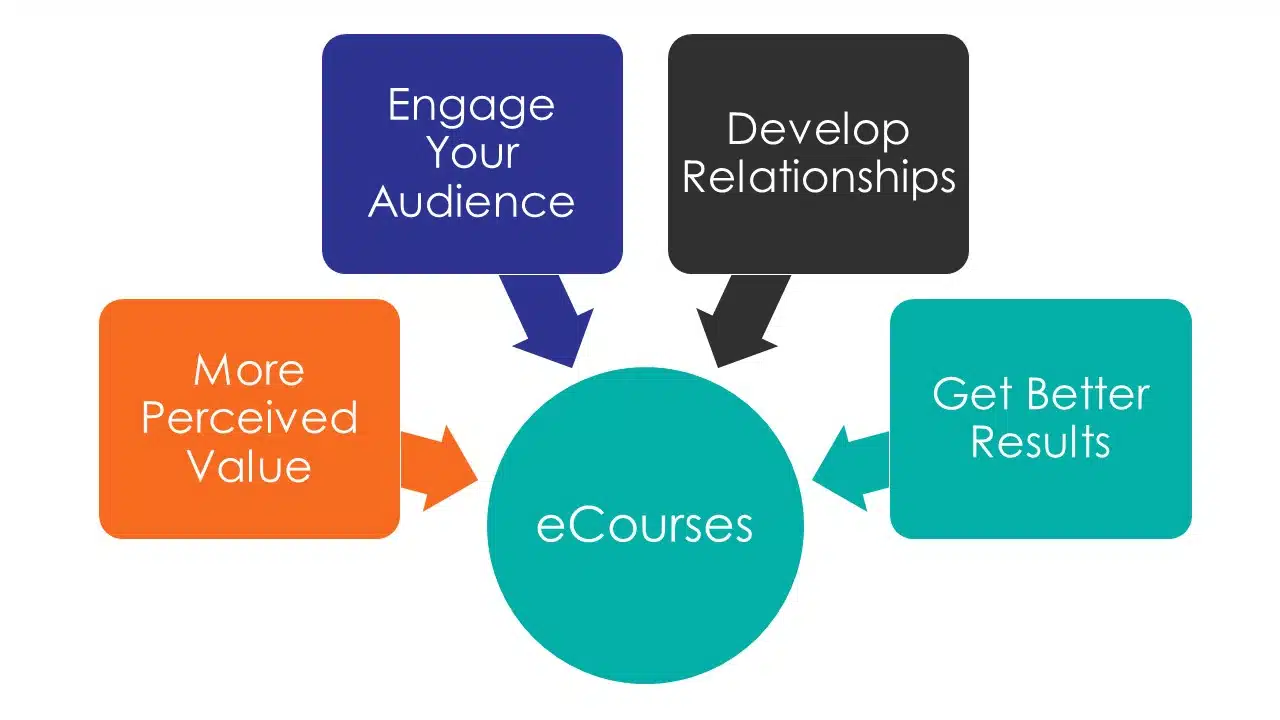
- eCourses have more perceived value since your subscribers receive content from you more than once
- Courses engage your audience more, since they're given concrete actions to take
- Sending content in separate emails gives you more time to develop a relationship, especially if you also combine it with live elements
- Dripping your course over several lessons gives people time to take action on what they're learning, which leads to better results, which leads to you looking like a star.
But creating a course is so time-consuming, and there are so many moving parts, and it's expensive to subscribe to one of those nice course platforms, and, and, and…
Nope. Creating an online course you can use to build your list just requires 3 things:
- A WordPress website (blog)
- An email marketing platform (for list building)
- A brandable, done-for-you course
In this tutorial, I'll show you exactly how you can quickly create an online course with WordPress, without any fancy software, expensive subscriptions, or complicated tech skills.
The only things I'm going to assume are that you have a WordPress site already and an email marketing platform. I currently use ActiveCampaign, but I've used Aweber in the past.
There are two main parts to creating the course:
Part 1: Create the Course Content
For this, you'll need:
- A good ‘how to' report or course that's brandable and gives you a license to edit it. Almost all the content we have Content Sparks provides those rights when you buy a license. For example, check out our course on The Power of Storytelling in Marketing.
- Some basic document editing software, like Microsoft Office, so that you can edit and brand your content. You'll also use that to convert any downloads to pdf.
- Admin access to your WordPress blog, with the ability to add posts and pages. If you're not good with basic WordPress posts, you could also hire someone to add the content for you and make it look pretty.
Part 2: Build Your Opt-in Funnel
To subscribe people to your course and deliver the content, you'll need:
- An email marketing platform that includes a feature for automatically sending a series of emails. Any halfway decent one should have that ability.
- A page that includes an opt-in form where people can sign up for your course and get those emails sent to them. You can create this page in WordPress and add the form code from your email platform. Or, optionally, you can use a page-builder that provides customizable templates. I use LeadPages, since they have templates that are already proven to convert. All I have to do is link it to my email platform and pick the right list to subscribe people to.
Ok, now for a bit more detail. I've broken down each of those two parts into the steps you'll need to follow to set up your online course funnel in WordPress and deliver each lesson via email.
Part 1: Create Your Course Content
Using brandable, done-for-you content is what's going to make your course content creation time fly by. So grab a package that you already have on your computer, or check out the ones we have in our Shop.
Make sure it has an Action Guide or Workbook that goes with Learning Activities or Action Steps in the main report or Course Book.
- Each chapter or module will be a lesson in your eCourse, inserted into a password-protected WordPress post
- Each worksheet will be a download inside that lesson post
Now follow these 10 steps to put together your course content:
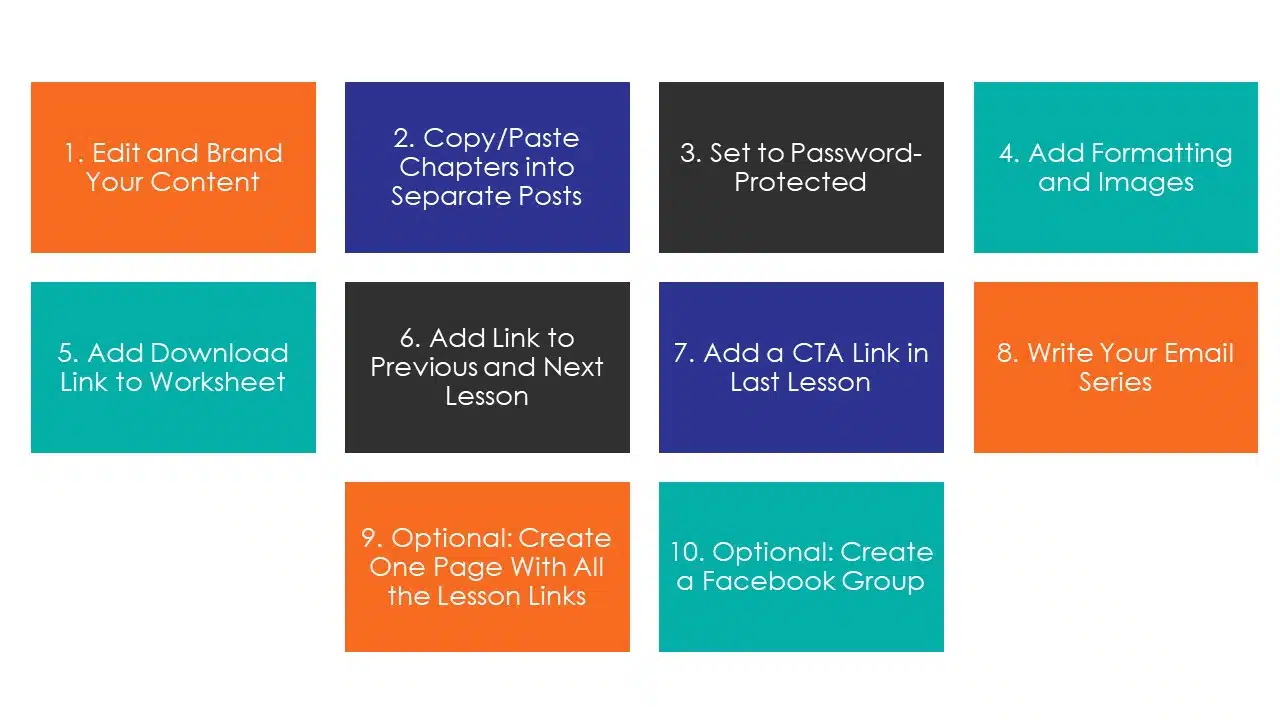
1 – Edit and Brand Your Content
Look through your main course content and edit anything you want to change. Add your own insights and examples, remove content that doesn't work for your audience, add links to your own resources, etc. It's up to you. But remember that quality AND speed are the goals. So you don't need to rewrite everything. The whole point of using good brandable content is that you can use it as your base and only edit where you really feel it's necessary.
Add your branding to anything that you'll want people to download, mainly worksheets. If you have one of our Action Guides or Workbooks, do all the editing and branding there. Then break it up into individual worksheets, in separate files.
You then need to save it as a pdf and upload it to your WordPress ‘Media' folder, so that it's ready to download.

2 – Copy/Paste Chapters into Separate Posts
Next, create separate posts in your WordPress site for each of the modules or chapters in your course. Then copy the text from each chapter and paste it into the appropriate post. If you're using Microsoft Word, a lot of the formatting will copy over. Alternatively, you could copy the text into something like Notepad to remove the formatting. Then paste it into your post.
Remember to save the draft of each post after you've pasted in the text and given it a name! You'll learn that lesson the hard way when your computer crashes and all your work is lost. Been there, done that.
I also recommend you make it clear in each post name that it's part of your course series. Number each one and put the name of the course in the title.
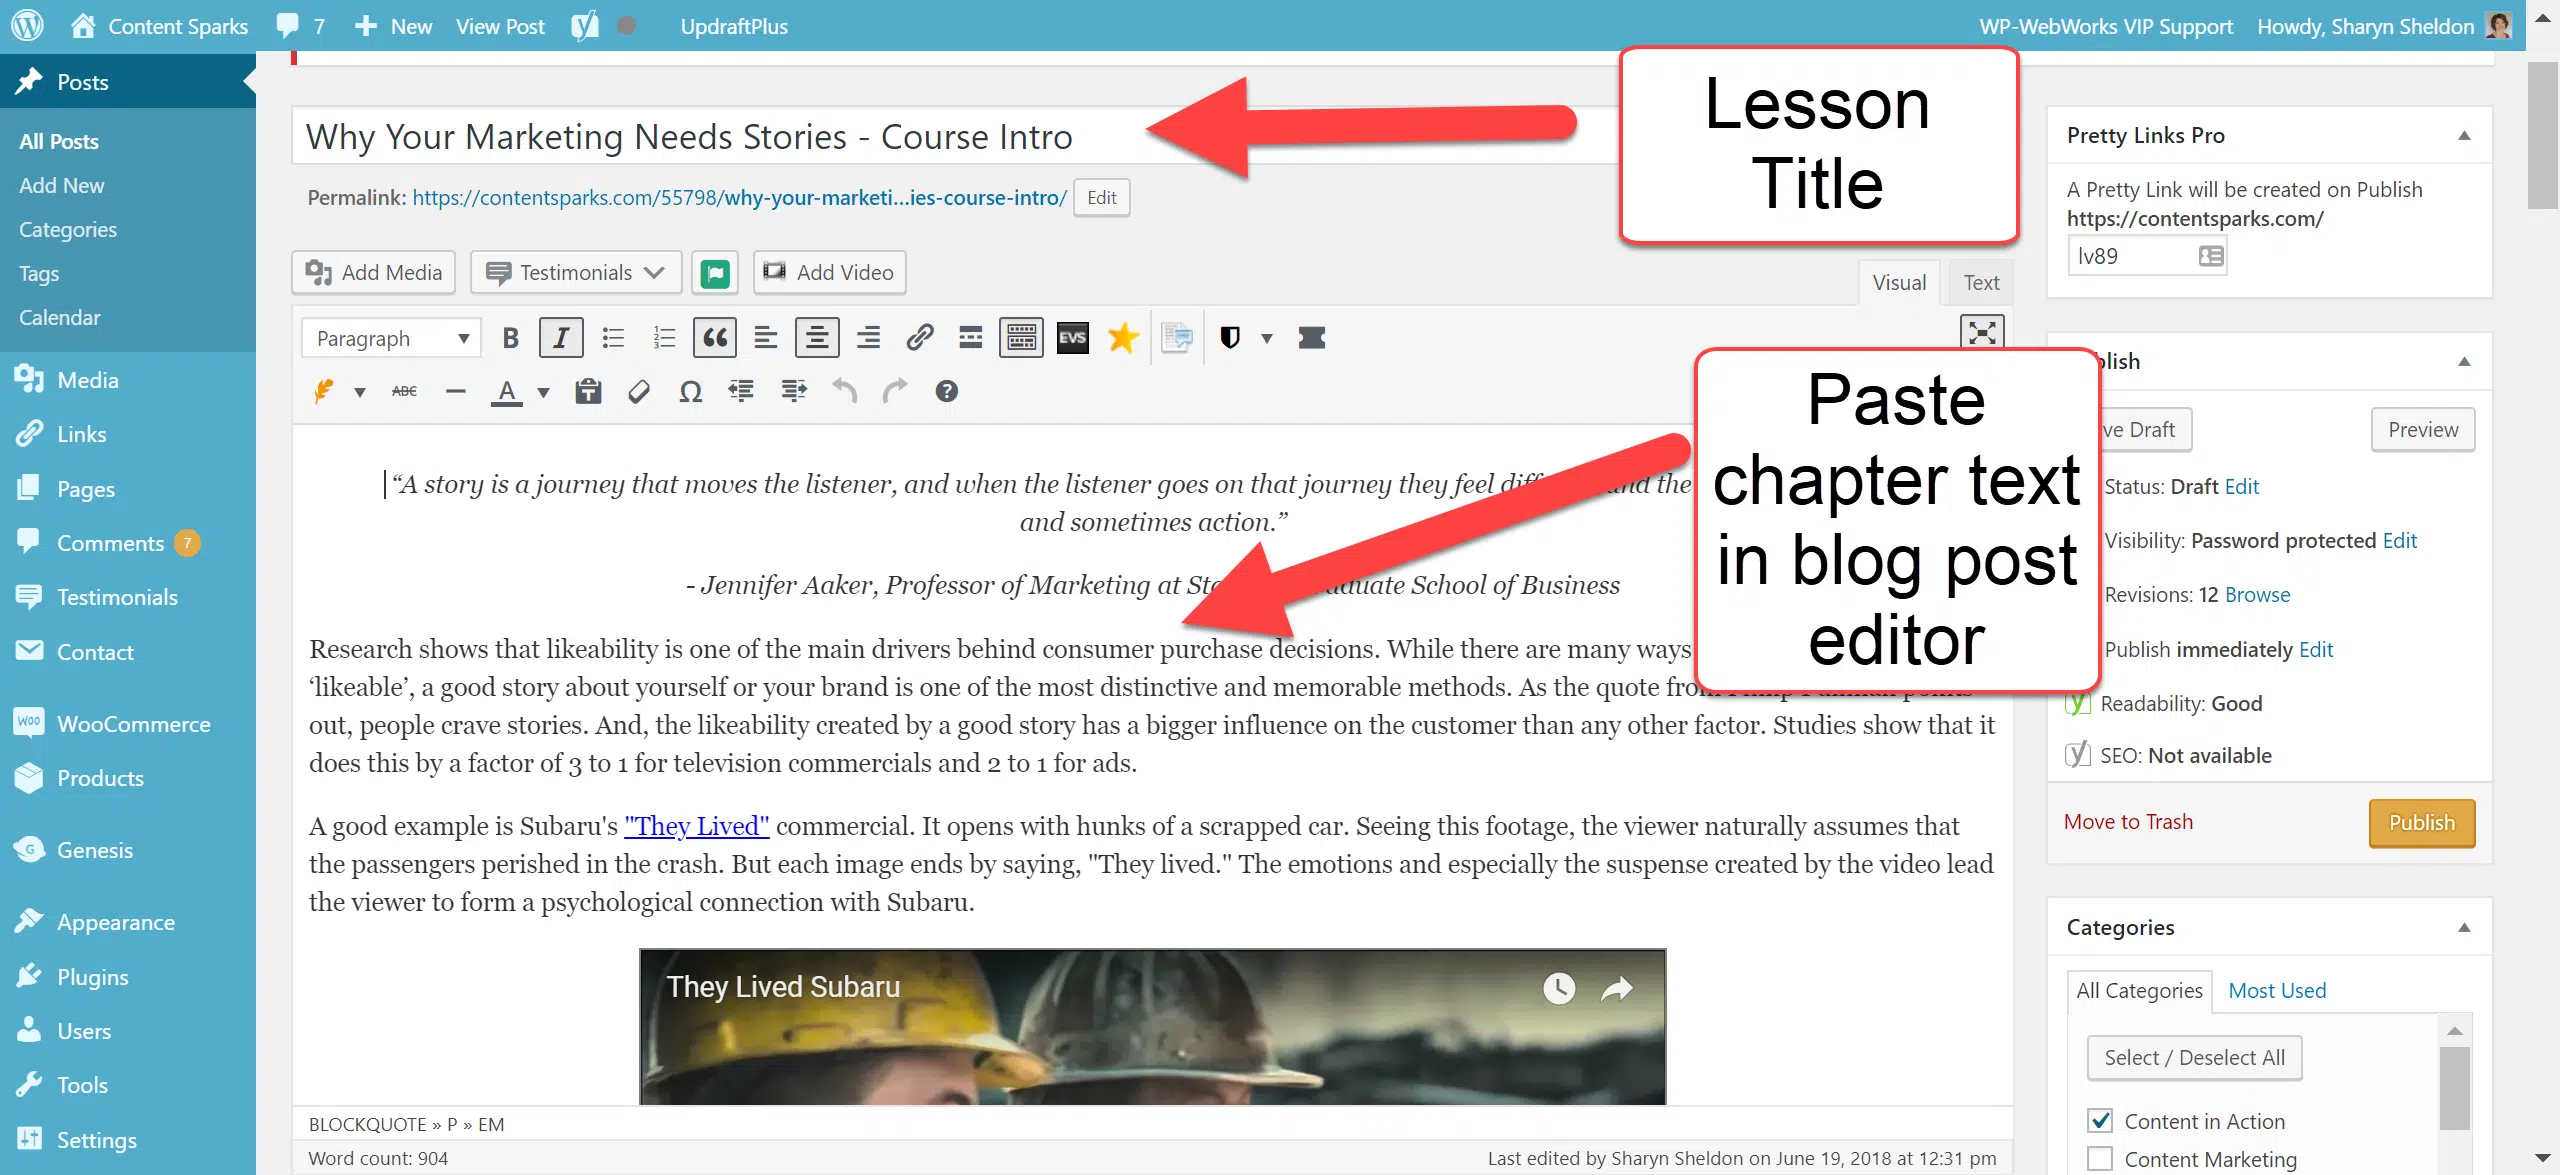
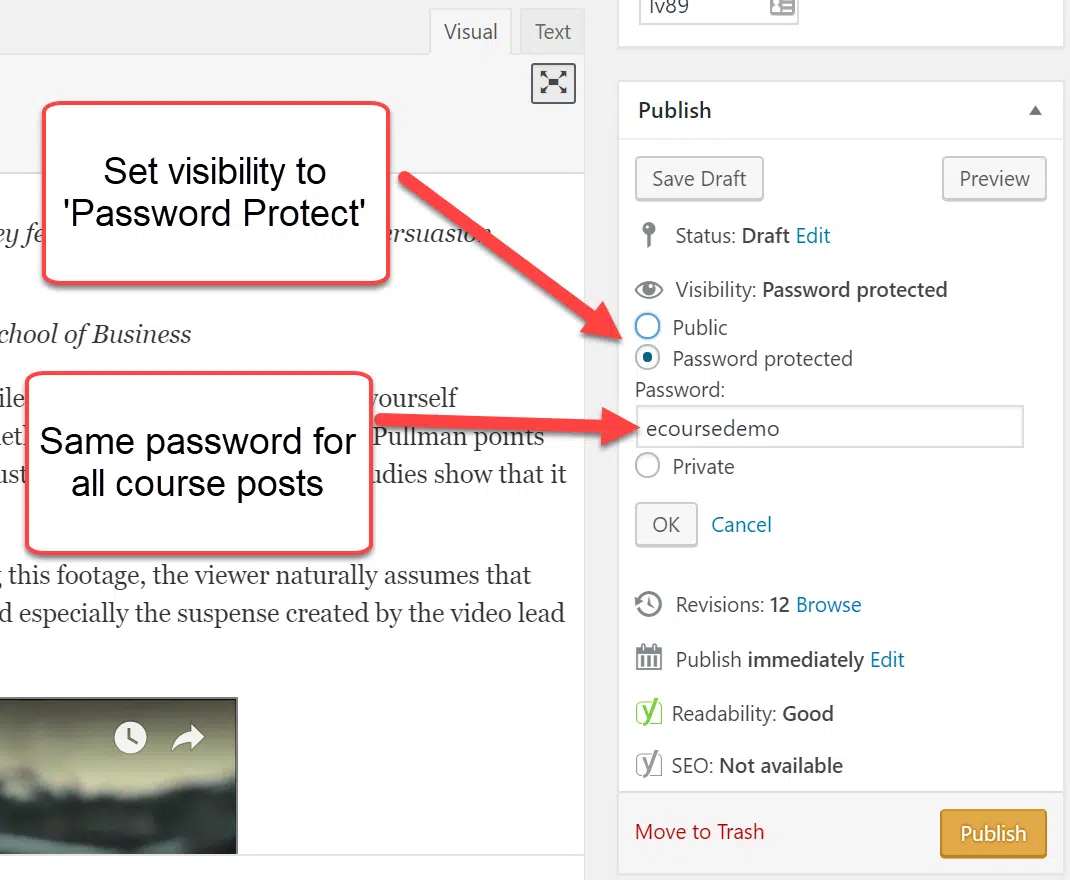
3 – Set to Password-Protected
Since you don't want just anyone to access your course, you need to set your post to ‘Password Protected'. You'll then get prompted to create a password. Use the same password for each post, so that it's easy for people to access each one in the course. They'll get prompted to enter the password when you give them the link to the post in your emails.
You can also use plugins to ‘hide' the post from search engines and site search. If you don't have those, don't worry about it now. Remember, we're keeping it fast and simple to get started.
4 – Add Formatting and Images
Here's where you may want some help if you're not great with WordPress formatting and graphics. You've pasted in straight text for now. But you should add some visuals to spice it up and engage people.
Based on the content, consider adding styling for quotes and sub-headings. Then add images, graphics to represent key points, or even videos.
5 – Add Download Link to Worksheet
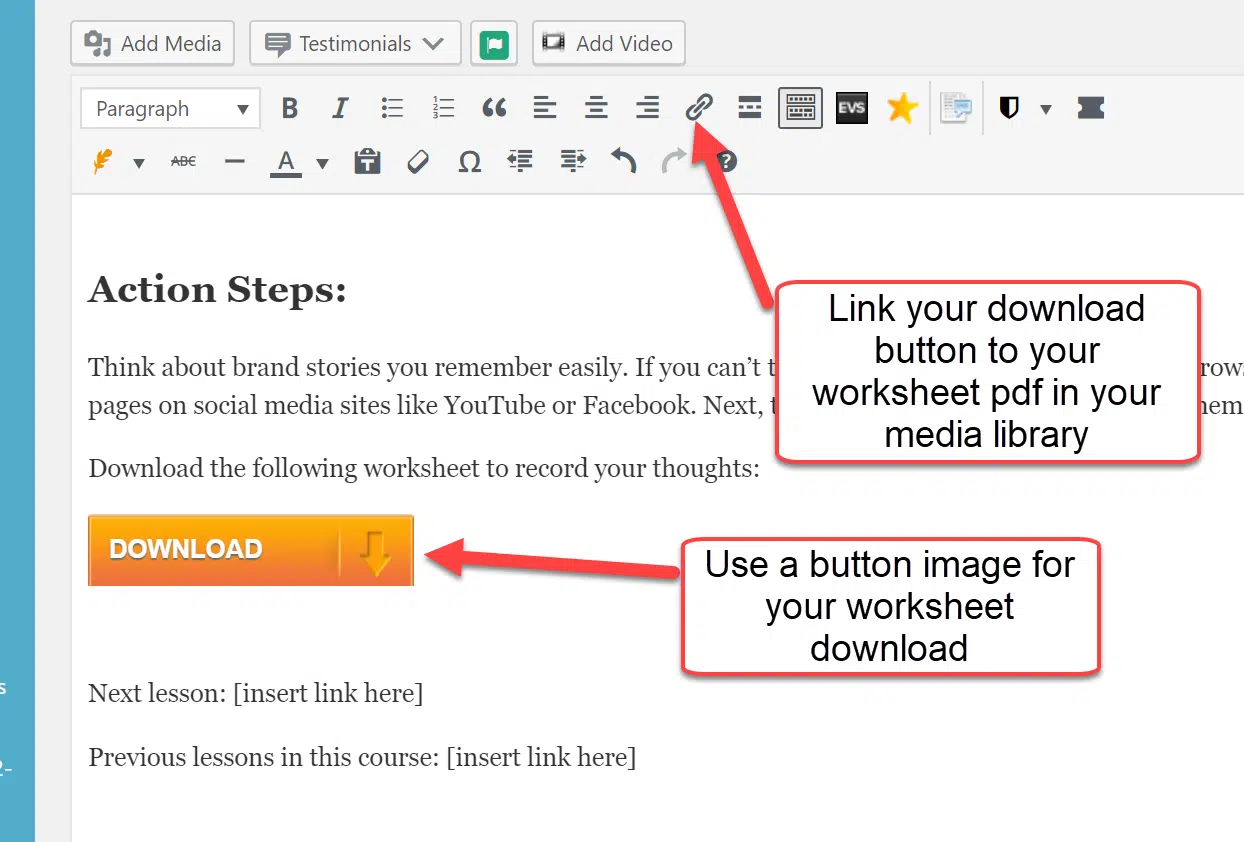
At the bottom of the post, make the Action Steps or Learning Activity very clear, with its own sub-heading. Underneath that, add a link to your worksheet pdf. Remember you uploaded that to your media library?
You can hyperlink some text. But it will look even better if you grab a button image, insert it into your post, and then hyperlink that to your download. Not sure how to create a hyperlink? All you do is highlight the little ‘link' icon in your editor and paste in the url from your media library file.
6 – Add Link to Previous and Next Lesson
At the very bottom of your lesson posts, it's helpful to put links to the previous lesson in the series and the next one. Obviously, the first lesson won't have a ‘previous' link.
This allows people to quickly navigate back and forth, so they can revisit previous lessons and then move to the next one when they're ready. It also keeps them on your site longer, which is always a good thing
7 – Add a CTA Link in Last Lesson
You want people to keep following you and eventually buy something, right? By the time they finish your course, they'll be ready to take action. So give them a ‘Call to Action' or CTA to another course or paid program or product, or strategy session where you'll sell services.
8 – Write Your Email Series
Your course content is all ready now except for one critical part – the emails you'll send to give people the links to each lesson.
Draft your emails in a separate document, with one email sending people to each relevant post in the course series. You can structure it like this:
Welcome Email – Thanks, welcome, what the course is about, what they'll get out of it, and link to first lesson
Lessons 2 through End – What they covered in the previous lesson, the benefits of this next one, and a link to the lesson. Plus, a few words of encouragement and where they can get help.
Final Email – Wrap up the course, where they can access all the lessons, where they can go for more help, a link to a course/product/service that will help even more
9 – Optional: Create One Page with ALL the Lesson Links
For people who want to go back and revisit the lessons, it's helpful to have one page where you list them all. You can reference that in your last email (see previous step) and offer it to them as a quick way to navigate their course, even after they've finished the email series.
10 – Optional: Create a Facebook Group
The ultimate relationship-building results come when you have conversation and interaction with your students. You can do that via email, but a Facebook Group that's dedicated to your course will generate more conversation as you grow. It also gives a place for students to ask questions and share ideas and challenges. That, in turn, gives you greater and greater insight about your audience.
Part 2: Create Your List Building Funnel
Now it's time to get people onto your list and start sending them through your course.
Since everyone's email platform is a little different, I'll leave those technical set up elements to the tutorials that your platform should provide. However, here are the basic steps that you'll need to complete. Any screenshots here are from ActiveCampaign, the email marketing service I use and love!
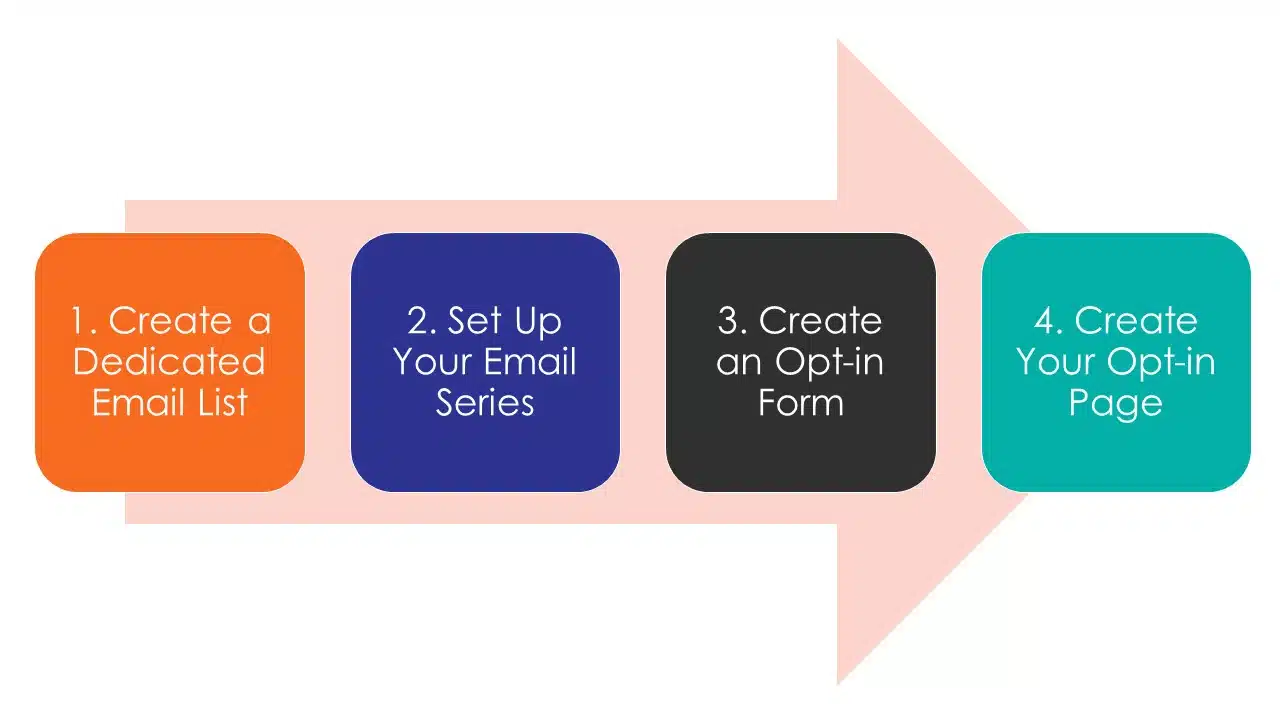
1 – Create a Dedicated Email List
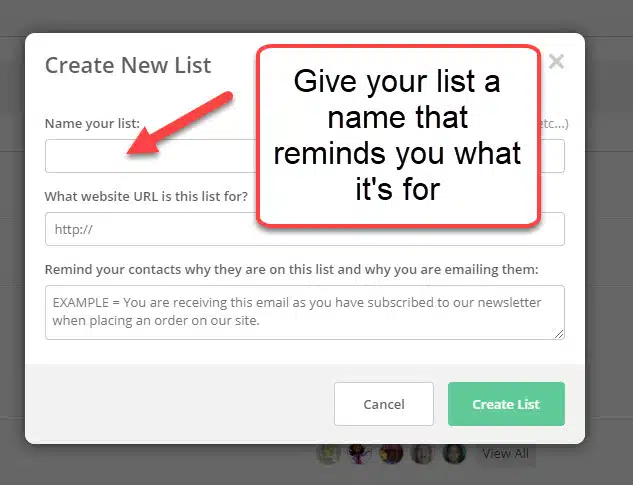
Your email marketing platform should have the ability to create different lists. Create a separate one just for this course, giving it a descriptive name so that you remember what it's for. That's it. There's isn't a lot involved here.
2 – Set Up Your Email Series
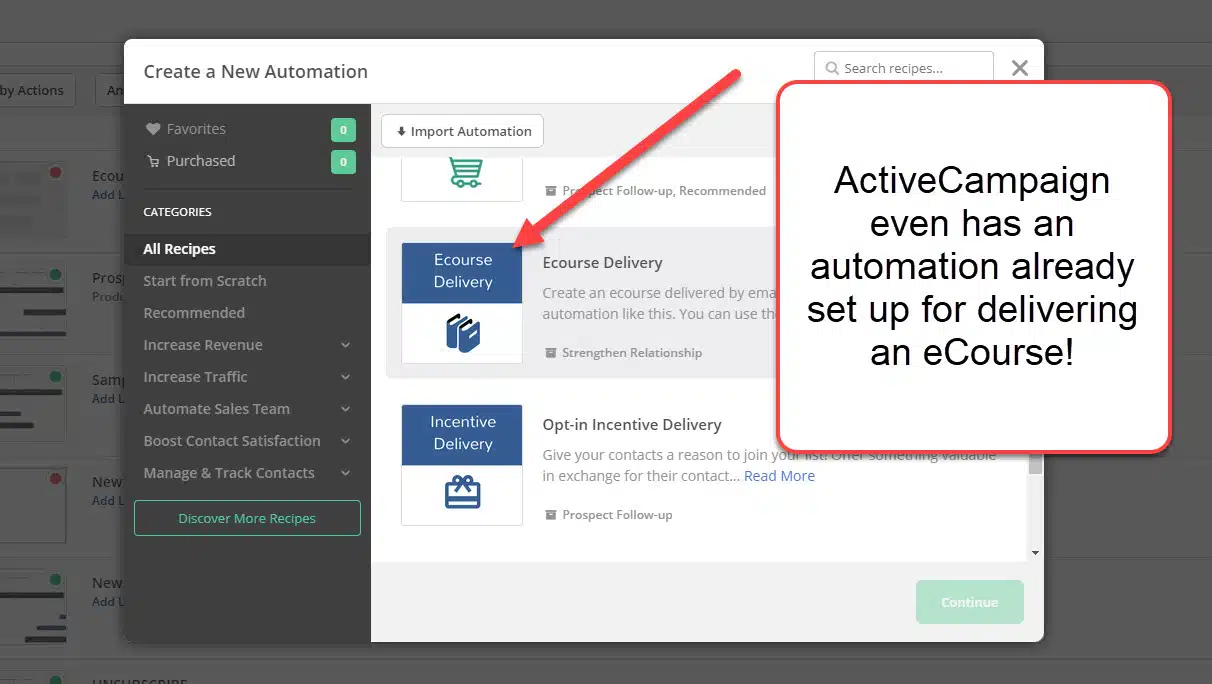
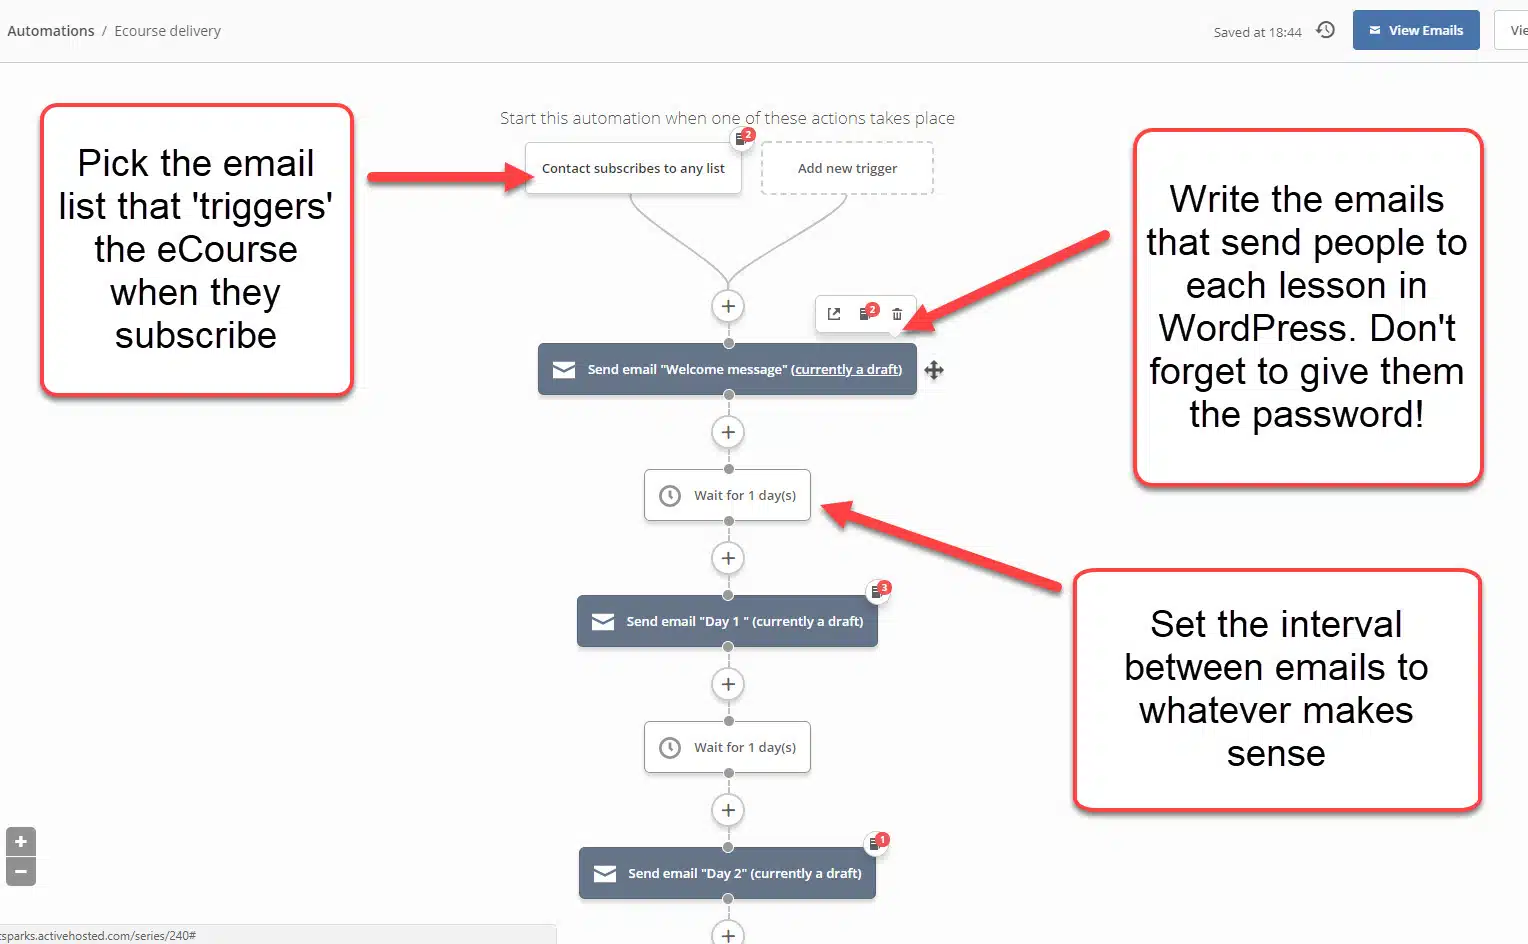
This is also called an autoresponder or follow-up series. In my platform, ActiveCampaign, it's called an ‘automation'. You set it to ‘trigger' when someone confirms they want to be on your list after submitting their information (see next step).
The first email should be your ‘welcome' email. Use your email platform's editor to paste in your text and include your link to the first lesson of the course in WordPress.
Personalize the email with their name, if you're collecting that information, and don't go too wild with pretty formatting. At the most, stick with your logo at the top and your headshot at the bottom, so that people know who the email is from. Remember, they don't know you well yet.
Do the same with the rest of your emails, being sure to include the relevant lesson link. You'll also need to set the number of days in between each email. Depending on the action steps they need to take after each lesson, you could set it to deliver daily, every few days, or once a week. Don't go longer than that or people will forget who you are.
3 – Create an Opt-in Form
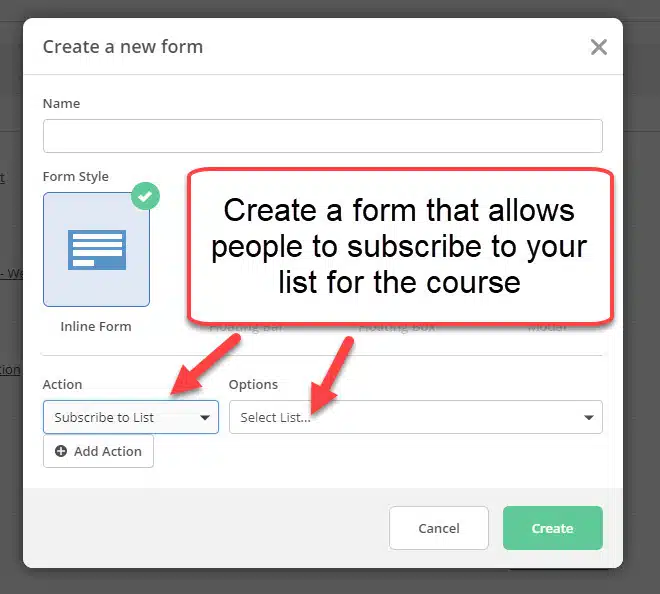
Every platform has a feature for creating a sign-up form. Set one up that asks for people's email and, optionally, their name. Make sure that you've set it to send out your first email after they've confirmed they want to sign up for the course
4 – Create Your Opt-in Page
If you're using a WordPress page, you'll have to use some editing skills to make it look pretty. Then add the code for your opt-in form in the ‘Text' or html view in the page editor.
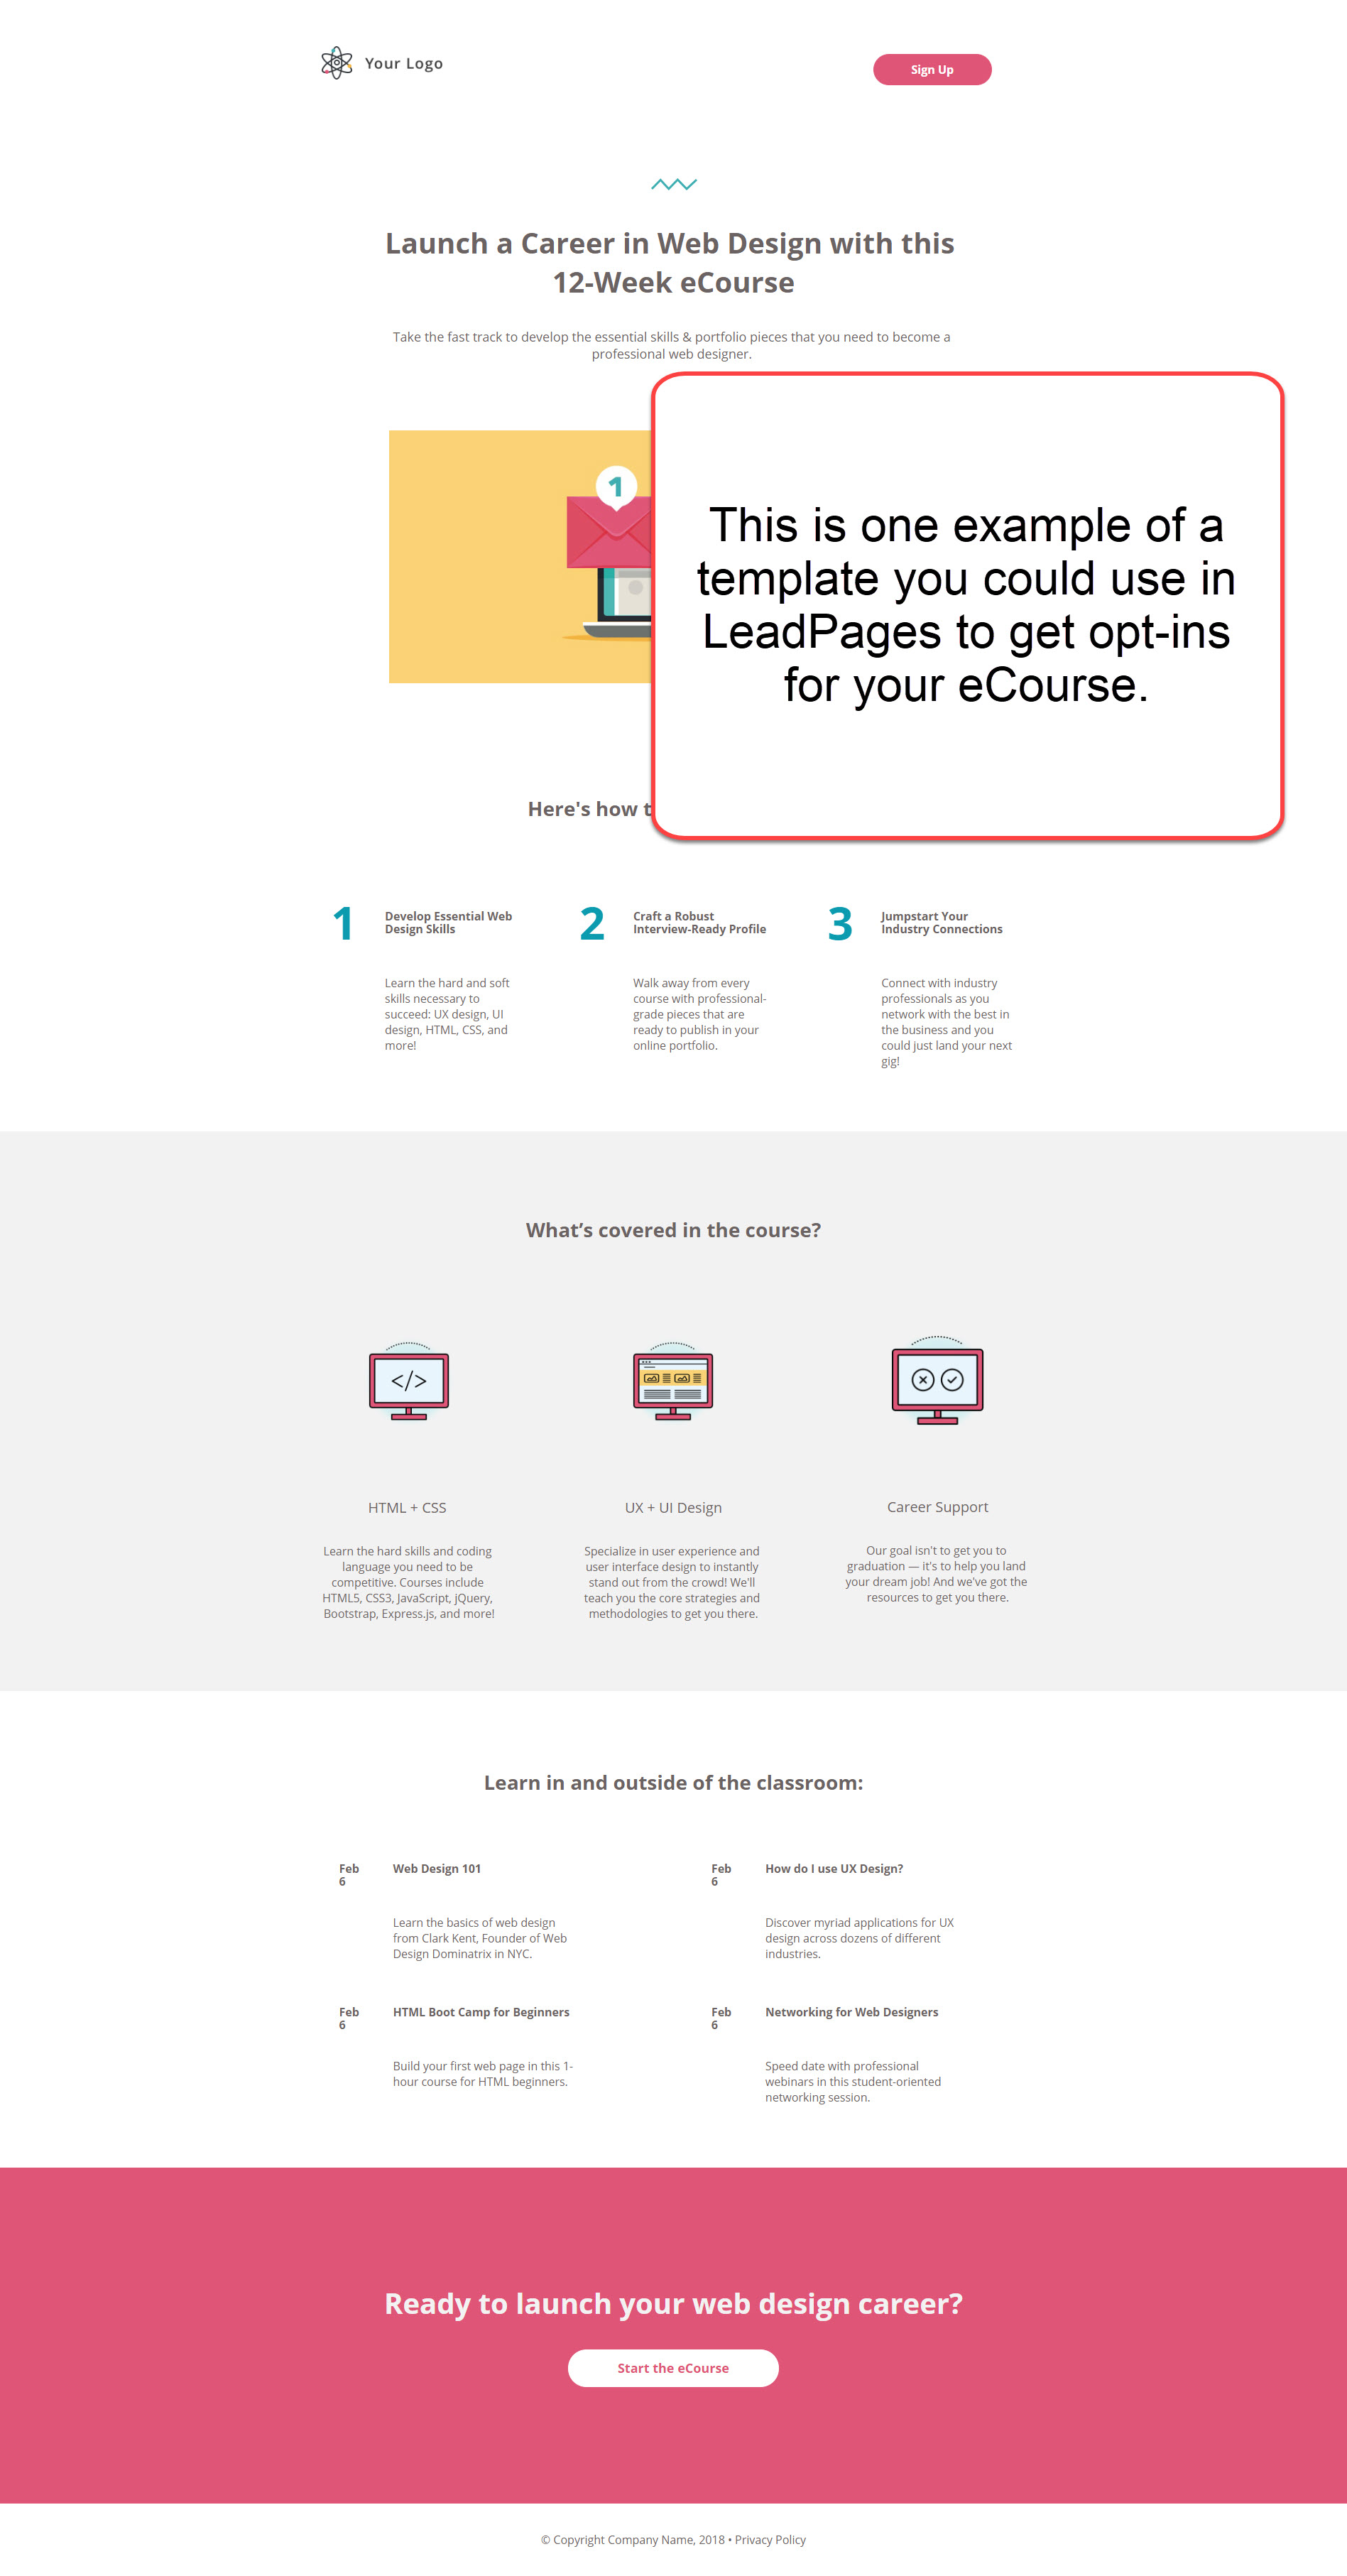
Otherwise, if you use something like LeadPages, create your page and follow the tutorials to link it to your email platform and list. You can even create a pretty thank-you page and set up your opt-in page to send people there after they've submitted their details.
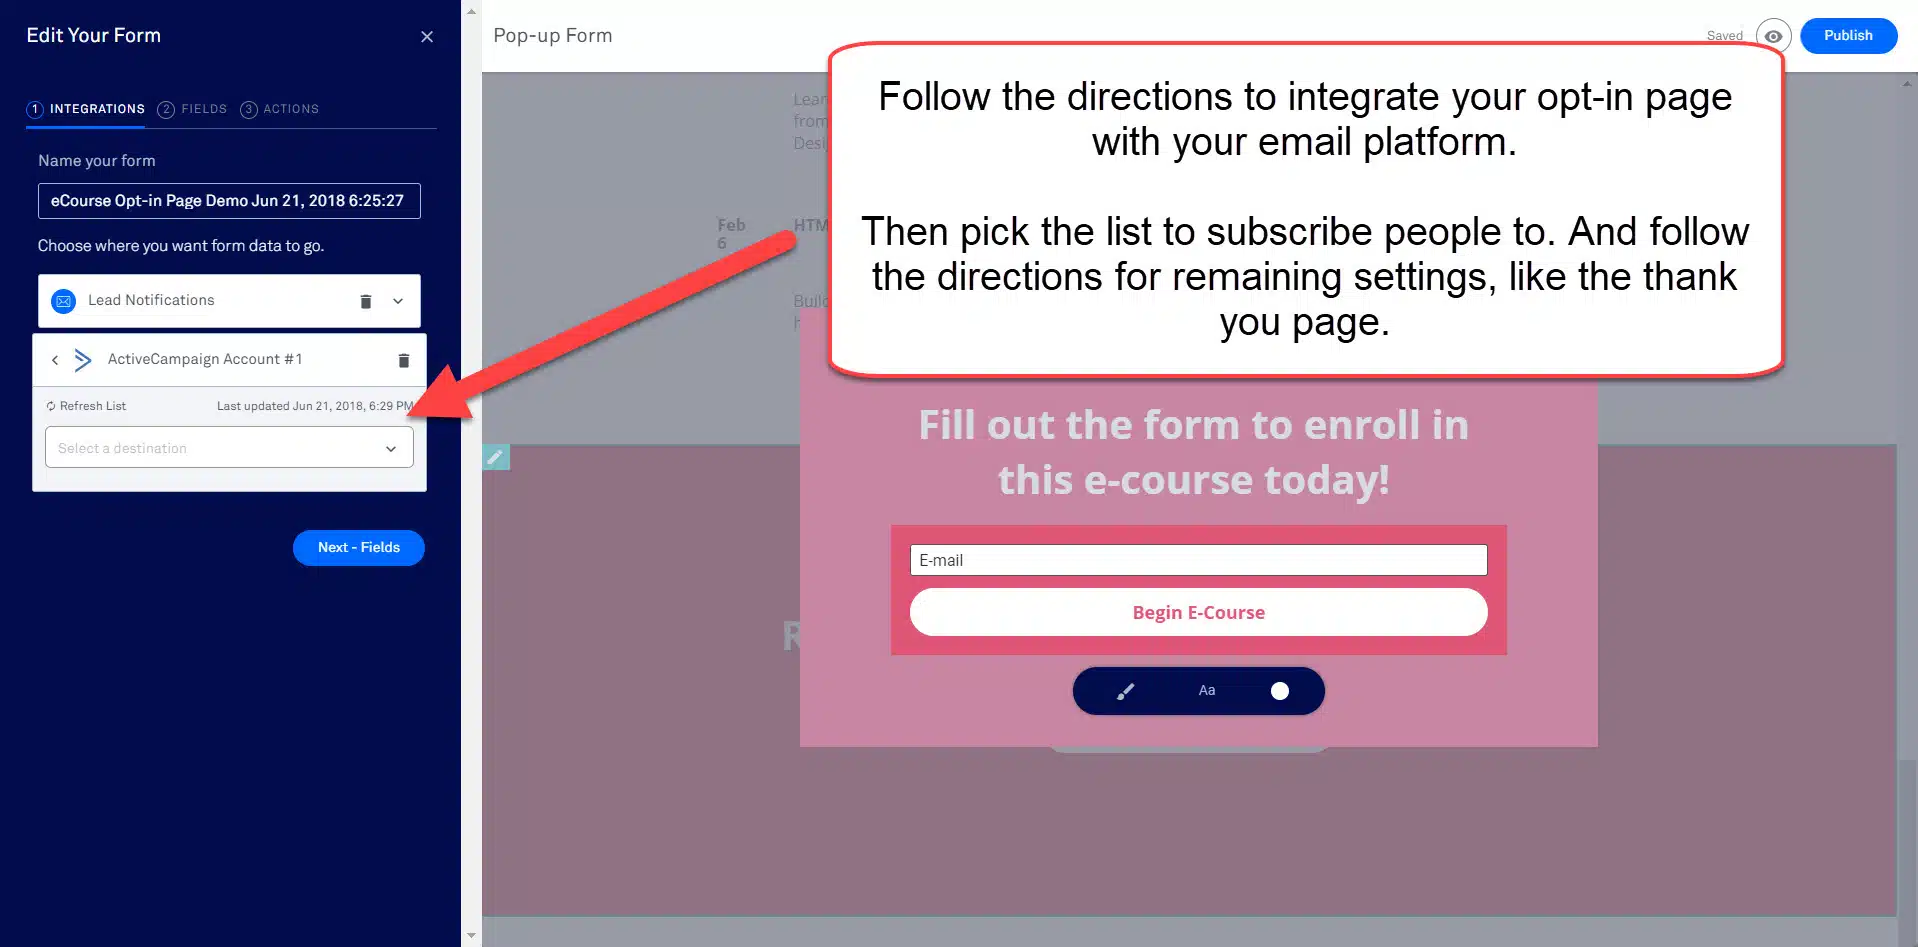
Finally, you should always TEST EVERYTHING. Sign up for your course and make sure you are sent the appropriate confirmation email and first email in the series. Make sure all your links in emails are sending you to the right lesson post. And test your download links to make sure you can access the relevant worksheets.
And last, but not least, start driving traffic to your opt-in page so you can watch your list grow and your business take off.
Your new online course is an asset that you can use at any time to attract and build a relationship with potential customers. However, you can also use it as a bonus for current customers. They'll appreciate the extra help and keep coming back to you as a result.
Want to download a pdf of this post, along with a handy checklist of all the steps to cover?
Just click on the box below to request the download:
Not sure what online course to create first?
Check out the one I mentioned earlier on The Power of Storytelling in Marketing:
The Power of Storytelling in Marketing
Teach Yourself. Then teach your audience.
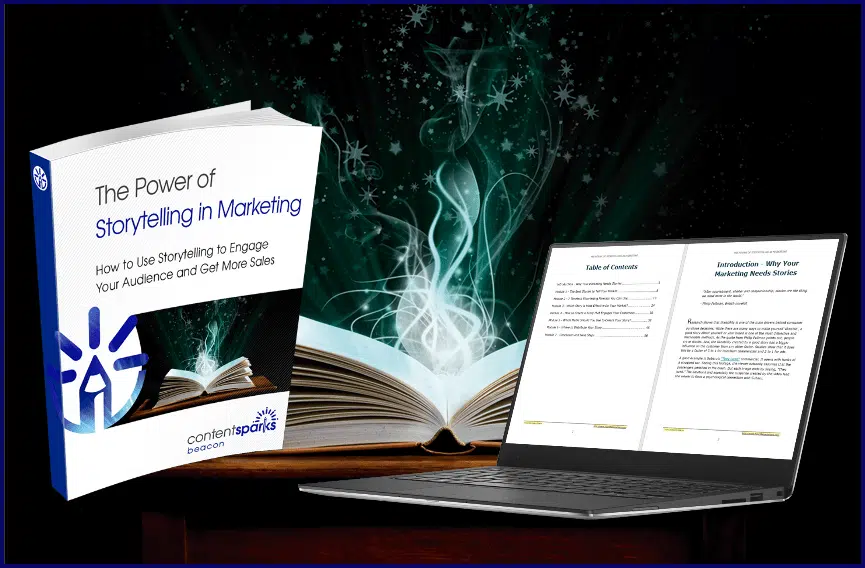
You'll get a course book and action guide to use in your eCourse, as well as some other content you can use to create video, webinars, bonus handouts, and more.
Everything is editable and brandable. So you can quickly use your new content to grow your list of leads, create a value-packed resource for customers, or even sell it as a new income stream.

Tags
You may also like
Comments are closed.

Thak you, Sharyn!
Excellent tutorial as always – great help.
Is it possible for you to create “mini-course” or tutorial showing your best tricks and tips using Word for creating graphics? They are awesome…
Hi Jan! I’m so glad you liked it. As for graphics in Word, we’re just using ‘Smart Art’. It’s actually easier to do those in PowerPoint. Do you have Office 2010 or higher? You’ll need that for Smart Art. Otherwise, you have to insert shapes and lines and whatnot, which takes a lot longer. When you’re done, you can save any ppt slide as a png or jpg to make it an image.
And that’s your super-mini course ;). I’ll do a visual one on video too.
Awesome! I have been looking for straightforward instructions in how to do this. THIS is what marketing and retention looks like.
Great example for all of us just learning. Plus I get to keep my hair?
I just created a course and I’ve been wondering what was the easiest way to deliver it- thank you for this suggestion! I love the work you do.
What a great resource this page is.
Definitely the way to go for setting up initial engagement with people who opt-in to the main web-page or another lead magnet.
Gets it going fast.
Thank you!!